Monthly Archives: May 2011

Growing Peppers

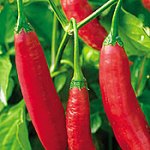
Peppers!  So many flavors, colors, sweet, mild, hot and………WOW give me some milk fast HOT!  I grow them all.  Peppers are warm weather lovers.  Although, over 90 degrees for extended periods they stop producing fruit.    I start planting peppers starts in my garden around the first of May.  Any earlier they don’t grow and the spring winds we get howling through the garden, they seem to suffer and get torn up.  If I do get the urge to plant sooner I do cover them with row cover.  My peppers usually get popped into a spot where lettuce was grown for early spring harvest and is then cleared out.  I work the soil and add 4″ of compost.  Ahh, compost!  My peppers receive full sun until around 5 pm.  It gets hot here and I have to protect the fruit with floating row cover from sunburn.  Peppers with sunburn get a leathery, sunken look on the top and south side of  the pepper where the sun hits it the most during hot days.  Space peppers 12 inches apart.  This close planting helps the plants shade their own fruit from sunburn.  When planting, I will add a tablespoon of all-purpose fertilizer (well-balanced) in each hole and mix it up a little with the existing soil and pop the pepper plant in covering the roots ball, but not firmly.  Water deeply and don’t let the soil dry out.  I start to mulch mine when the mercury rises.   This helps retain water and keep the roots cooler.  I fertilize every three weeks until mid-fall.  When harvesting your peppers cut off the fruit rather than tug and pull.  The plants are brittle and you don’t want to pull on a pepper and end up with half of the plant in your hand.  Peppers don’t like to be planted with onions.  It seems to stunt them. Try some new varieties this year and surprise yourself. Ancho and Anaheim for roasting,  little sweet stuffing peppers with a little bit of cheese on the grill,  jalapeno for mango salsa, cayenne for making your own cayenne pepper.  What ever peppers you choose find new ways to serve them, because there are so many.  Why get stuck in a rut! 
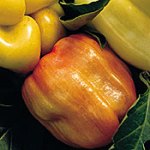
Summer Bell Salad

  • 1 large red bell pepper cut into bite sized pieces
  • 1 large yellow bell pepper cut into bite sized pieces
  • 1 large green bell pepper cut into bite sized pieces
  • 6 green onions, minced
  • 4 cups baby spinach
  • 1/4 cup parsley, chopped
  • 1/2 cup golden raisins
  • 1/2 cup walnuts or pecans coarsely chopped
  • Mix everything in a large bowl and toss with dressing

Dressing for Bell Salad

  • 1/8 cup raspberry vinegar
  • 1/4 cup olive oil
  • 1/4 cup honey
  • 1/4 tsp sea salt
  • Dash of pepper
  • Combine all ingredients until blended and pour over bell salad

Leave a comment

Filed under Gardening

Eggs, Chicks, Chickens, Eggs

This slideshow requires JavaScript.

I have mentioned before that our little farm all started with the three chicks my husband brought home.  There were two Rhode Island hens and an Araucana.  The first egg we ever got was from the Araucana.  I thought someone put a fake egg in the nesting box because the egg was a  shade of blue.  I had never seen such a color in an egg before and now they are my most prized.  Feathered friends have been a part of our daily routine for 25 years now and having fresh eggs is one of those things we couldn’t do without. Chickens are a growing frenzy in neighborhoods today.  Many urban cities are allowing up to 10 chickens (hens) right in small city lots. They are so easy to care for and they give back ten-fold.  Besides the beautiful, rich eggs they produce, they are little composters, bug getters, manure producers and if that wasn’t enough,  the enjoyment you get from watching your flock forage in your back yard is somewhat peaceful.  Chicks can be purchased at many feed stores or pre-ordered through catalogs and come through the mail.  If you have access to fresh eggs from a farm with a Rooster about, you can even venture and incubate your own in only 21 days.  An advantage of ordering your chicks is that you can get chicks that have been sexed so you will have all pullets (females).  I  order my chicks from mypetchicken.com and  mcmurrayhatchery.com when I not incubating my own.  They have a great selection of rare and exotic chickens.   Over the years I have dabbled in many different varieties including, silkies, polish, hamburgs, cochins, wyandottes and so many other varieties, but my favorite chickens are the great egg layers like the Cucoo Maran a chocolate-colored egg layer, Araucana which lays shades of green to blue, Silver Laced Wyandottes that lays good during the cold winter months and is beautiful in the orchard roaming about, and the old-time stand by, New Hampshire Reds and Barred Rocks.  Of course we always have a few odd balls joining the flock of girls to try new varieties.  But anymore my main reason for raising chickens is for egg production so I stick to the heavy breads and good layers.

Starting your chicks is simple and you will be trouble-free if you are prepared ahead of time.  Keep a close eye on your babes the first few hours especially.  Your new little fuzz balls will need to be indoors for 5-8 weeks.   I keep them in a wash basin for the first few weeks then as they get bigger, I move the growing fowl into a pine box we built just for chicks.   A cardboard box will work just fine.  They need enough room to move around comfortably with a waterer and food tray.   These little babies like it hot! A warm brooding lamp with a red heat bulb is best.  Watch your chicks behavior.  If they are all cuddled up under the light they are cold!  If they are avoiding the light like the plague they are to hot and you should move the lamp up a little. Each week I raise the height of the lamp to lower the temperature about 5 degrees.  Fresh, clean water is so important.  Check it often!  I feed organic chick starter.  It has all the ingredients to give them a healthy happy start.  I like to feed this mash for the first 16 weeks and then I will move them straight into layer pellets or crumbles. Oh, those little cute fuzzy chicks poop and poop a lot!  They need their bedding cleaned often.  I put down a layer of newspaper (this helps for a fast clean up) followed with pine shaving to absorb the smell, keep them dry and give them traction.  Don’t use cedar shavings as they can contain toxins.  I will change the bedding daily just by rolling up the newspaper with all the bedding and toss in the compost pile.  Never let your babies stay in wet bedding!  Once they have a full plumage of feathers they can be put out into the coop.  If the weather is still cold I will put out the heat lamp for a few more weeks to get them acclimated to the new temperatures. Depending on the breed of chicken you will be getting your first eggs when your beauties are around nine months old.  That’s a day you will remember!

2 Comments

by | May 26, 2011 · 4:47 pm

Planting Companions

In nature, where plants grow without the ground being worked, there is always a mixture of plant types growing in an area that are happy in there habitat.  The type of plants living in an area depends on the soil type and climatic conditions .  Most plants that grow together in the wild are mutually beneficial in that they allow for maximum light utilization, moisture and soil conditions.  This is what we call companion planting.  Plants have a beneficial effect on different garden plants because of some peculiar characteristic of their growth, scent, or root formation and soil demands.  Some plants that have strong orders, including those with aromatic oils, play a role in determining just which insects visit the garden.  While some plants repel, they can also hinder the growth rate of other plants or otherwise adversely affect them.  I have seen good results and not so good.  Yes, tomatoes like carrots, but you do sacrifice a little bit in the size of your carrots due to the shading that tomatoes cause.  I don’t mind because I like tomatoes more and I like baby carrots better!  I have listed some things that grow well together. 

  • Basil: Tomatoes (improves growth and flavor)
  • Bean: Potatoes, carrots, cucumber, summer savory
  • Beets: Onions, kohlrabi
  • Borage: Tomatoes (improves flavor & growth, deters tomato worm, attracts bees) squash, strawberries
  • Carrots: Peas, lettuce, chives, onions, leeks, rosemary, sage, tomatoes
  • Chive: Radishes
  • Chervil:  Radishes (improves growth & flavor)
  • Dill: Cabbage (improves growth & health), carrots
  • Flax: Carrots & potatoes
  • Fennel: Most plants seem to dislike it. 
  • Garlic: Roses & raspberries (deters Japanese beetle), plant liberally throughout garden to deter pests
  • Horseradish:  Potatoes (deters potato beetle)
  • Hyssop: Cabbage (deters cabbage moths) grapes
  • Lemon Balm: Here and there in the garden
  • Marigold:  Keeps soil free of nematodes, discourages many insects. Plant freely in the garden.
  • Pea: Squash
  • Petunia: Protects beans, beneficial throughout the garden
  • Nasturtium: Deters aphids
  • Rosemary: Carrots, beans, cabbage, sage
  • Summer Savory: Beans, onions, deters bean beetles
  • Tansy: Plant under fruit trees, deters ants squash bugs
  • Thyme: Plant throughout the garden
  • Wormwood: As a border, keeps animals out of the garden
  • Yarrow: Plant along borders, near paths, enhances essential oils in production of herbs.

Not only do these plants improve the growing, flavor and overall health, they also give your garden interest and character.  Don’t forget to add to your garden journal which plants thrived and which, not so much.

2 Comments

Filed under Gardening, Herbs

Creating a Succulent Garden Bench

Even here where the temperatures reach above 100 degrees for more than three months and winter months dropping in the teens, these succulents grow and spread across the bench cheering up a blank space in a corner of the yard.  Simply cover the seat of the bench and up the back a ways in burlap and then a layer of thick weed mat.  Burlap is more appealing to look at then the weed mat, so that is the only reason for using it.  Use a good potting soil to fill in the seat and up the back and start planting your favorite succulents.  They will fill in with time but for an instant look plant thickly.  Tuck the burlap in and around the plants to cover any potting soil and weed mat.  Water in!  I only water about 2 to 3 times a week here in the desert and no water during the winter unless we have had a complete drought.  Use Hen and Chicks,  Dragons Blood Sedums,  Stonecrop and anything available.  Once they start to crowd out, thin out and share with a friend for their new bench.

Leave a comment

Filed under Garden Whimsy, Gardening