I have to admit that I was never fond of figs until about 10 years ago. But, the silly thing is I never knew why! How could I have not have liked figs if I never tried a fresh fig. Heck, I liked fig newtons! I even planted a fig tree in my orchard. Okay, so I am a stubborn creature…. Luckily I finally gave them a whorl once the tree started to produce and now it is one of my favorite trees in the orchard.
Figs are a Mediterranean plant. They are hardy in Zones 8 to 10, but can be grown in pots that can be brought in out of the harsh cold winters or planted on the south sides of buildings for extra winter warmth and protection from harsh winds and should be bundled with a thick layer of hay or straw and burlap. A properly wrapped fig tree should survive winters even down to Zone 6 sometimes colder. When temperatures drop below 10 degrees Fahrenheit without proper protection, figs will be lost to the cold! Moral of the story is, if you live in zone 7 or lower and you are not good at doing protective covering, you might be better off planting figs in containers.
There are over 200 fig cultivars grown in North America with a wide range of color and shapes. Most figs are self-pollinating, outside of a few odd balls, so no need for a pollinator! I have grown several varieties here, but have found my favorites are Black Mission, Kadota, Brown Turkey and Celeste. These cultivars do well here and are full of flavor.
Figs will fruit two, seldom three, different times during the season on new wood. The first starts here in June, giving off the biggest best fruits and the second is late summer. Although the second harvest is smaller fruits, it always seems to last a little longer in the season sometimes continuing a month. Many times in mid to late September new fruit starts to set. Because of the cold weather they tend to grow slow and rarely do they ever mature unless we have a very late frost.
Luckily for us, figs like a more alkaline soil and lots of sun! If you live were the soil is more on the acidic side, apply lime around the base of the tree. Keep figs well watered during the fruiting season to assure proper ripening and larger fruit. Apply rock phosphate around the base of the tree in early spring and mulch with plenty of compost.
I was told once to dip my finger into olive oil and coat the bottom of each fig to hasten the ripening. Well, when you have thousands of figs on one tree, that hardly seems sensible, but for potted figs, I can assure you, it really does the trick! The figs touched with olive oil mature and ripen ahead of others.
Harvest often! The warmer the weather, the faster they ripen. Figs will become soft to the touch when ripe and sometimes the skin will begin to split. Know the color of your figs while some are a light golden-green and others are dark brown or blue/black when ripe.
As far as pruning figs, Keep the suckers that sprout at the base of the tree and any suckers that form from the roots. Keeping fig trees open makes them much easier to harvest the fruit. Figs will grow rather informal, so prune to keep under control and open. Keep dead and damaged branches removed. Figs can be espaliered, but you have to keep on them all time to manage a good-looking espalier tree.
Figs are generally disease and insect free. Our biggest problem is ants that climb up the branches to feed on the fruit, but a layer of wood ashes keeps them at bay. Birds can be a serious pest problem. Once they taste the ripe fruit, well they are on it like BIRDS! Netting works well for smaller or containers figs trees.
What to do with all those figs…..Figs will spoil rather quickly. Making a puree out of figs by simmering them with a touch of honey and lemon for 20 minutes then running them though the food processor and freezing them makes a great filling for cookies like fig bars or it can be spread on toast.
Dehydrating them is a super quick and easy way to preserve figs for winter snacks, or even chopped up and put in whole wheat breads.


Fresh Black Mission Figs

Save the left over fig liquid reduce with balsamic vinegar for balsamic vinegar.
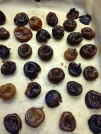
A friend of mine shared a recipe with me this year and I have enjoyed it more than anything I have done with figs. It’s called Carmel Candied Figs. While it takes days to make, it is a very easy process. Day One; Place 6 pounds of figs in a heavy stock pot, adding 1 cup honey, 1 cup water and simmer with a lid on for 1 hour. Swirl the liquid, but don’t stir the figs or they will tear. Let sit overnight. Whole spices can be added like, cinnamon, star anise or allspice, but it is not necessary at all! Day two; simmer figs without lid for 1 hour. Let sit overnight. Day Three; simmer figs without lid for 1 hour. Cool. Line 2 cookie sheets with parchment paper. Place figs, stem up, flattening slightly on cookie sheet and place in an oven with pilot light. Turn figs over, belly side up, the next day, turning a few times a day from stem side to belly. do this until figs are chewy. It usually takes about three days, depending on the humidity. I store mine in glass containers with a lid, but leave the lid ajar for a week to remove any extra moisture. Extra moisture will cause mold….You don’t want that to happen. They can also be frozen at this stage. These delicious figs can be eaten like this alone or can be added to fall breads, muffins, scones, custards or whatever you set your mind too! TIP: Save the left over liquid form cooking the figs down and add to two cups of regular balsamic vinegar, reduce by simmering for several hours. Here is your own fig vinegar for making the best salad dressing you’ve ever had!


