-

-
Heirloom Tomatoes
-

-
Casper the Perfect Cat
-

-
Sticking out the tongue
-
-
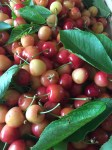
Queen Ann Cherries
-

-
Proud Casper
-

-
Mabes
-

-
Casper the Perfect Cat
-
-
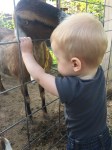
Our Grandson and the Goats
The year 2015 buzzed by faster than a gardener/small homesteader can imagine. Some good some not so good and some just life. As I look over the year, there are some things that just need to be noted. Tomatoes, goats, Casper the Perfect cat, garden successes and failures. We can learn from life experiences better than any text book or you tube video.
Our year started out with a bang…a mild January brought early planting for us. Peas, radishes, lettuce and all sorts of early spring veggies went into the ground. Un-covered no less! This can be a gamble, but as a crazy gambling garden I am, I went for it with great success. This was our mildest winter since 2000. February came and all our brassica crops went in the ground as well. The down side of the warm weather was many crops we planted for our CSA shares in the fall (planned for late February), bolted quickly before our shares even began.
March rolled around and we had 5 new kids on the ground! Baby goats that is. Milking chores were in full swing once again. We choose to bottle feed babies as this makes a tamer kid down the road. But this means having to visit the little kids several times a day, pet, play and just enjoy them. Life can be pretty hard to deal with sometimes! Haha! Cheese, yogurt and kefir were a weekly task to use all the milk our girls were producing an abundance of. You begin to get creative. Out of the five beautiful kids we got, we kept one sassy little girl and she goes by the name Briar Patch. These girls really become pets, not dairy goats! Our little grandson loves the farm life especially the goats!
Ahh, April! Time to get tomatoes into the ground. We saved seed from our favorite tomatoes two summers ago, but there are definitely some favorites that made it very exciting and some we just won’t do again. My daughter-in-law planted a month earlier than I did, and I have to admit, she grows some really amazing tomatoes! While hers petered out earlier than mine, she produced several enormous 2 pound plus Dr. Wyches tomatoes. Top on my list of “must-have” tomatoes to grow this year. Dr. Wyches; This orange tomato produced heavy all season long beginning in late June. Heavy and dense with no cracking. Such a good, mild flavor. Copia Tomato; Beautifully striped yellow orange tomato, medium sized, later in production but heavy in August. Our own tomato, Chicken Coop Green, mild flavored green tomato produced heavy later in the season as well. Nebraska Wedding Tomato; This one was a huge surprise. In 2014 I started this tomato from some seeds a friend gave me that was dated 2001. As predicted, it did not produce well, only giving me one single medium sized tomato. The plant was healthy, so I saved the seed to be planted as a trial tomato in our garden for 2015. I planted one in the greenhouse, one in the main garden area and one in an old trough out back, where things get neglected. I can not rave enough about this tomato! No matter where this guy was he produced! Apricot colored tomatoes that were medium sized. It was the earliest and the latest to produce. It has a nice flavor as well. Bread & Salt Tomato Seeds; Another favorite of mine. Best flavored tomato I think I have ever sunk my teeth into. Few seeds. Great for slicing or canning. Starts off producing huge tomatoes early in the season and becomes smaller as the months pass. Bread & Salt has a strawberry shape and is pink in color.
New chicks arrived late May. We love a variety of large breeds, laying shades of green, blue and browns. I’ve never been a white egg layer lover. Just to common! A variety of breeds also insures eggs all year round. Some lay better in hot times of the year and other in the winter months. Our mature chickens are at a ripe ole age that they do not produce well and we add new and replace old every year. We have found that banding them (this is not mean) with colored expanding bands we place on their legs. Each year has a new color. This just makes the job a little easier of picking older hens out with no mistakes. While you can generally tell an older chicken, I have made mistakes before.
Fruit was very abundant! Cherries, apricots, peaches, plums, persimmons, boysenberries and grapes! I don’t think a person should each a dozen white peaches a day! But, they don’t keep well and they are good for you…At least that’s what I keep telling myself. Our fig trees and pomegranates took a hit from the deep freeze December 2013 and froze right to the ground. We missed the fruit in 2014, but new growth and a little fruit this past summer gives us great hope for a bountiful crop in 2016. This year was our first real good crop of pistachio nuts. They have been in the ground for 17 years. These are the only trees that belong to my husband. I suppose my threaten to chop those “worthless” trees down caused them to finally produce. Funny how that works.
Fall arrives and we get a reprieve from the heat……..Ha! At least that was my thoughts. Little rain fall and temps that stayed in the upper 90’s and even 100’s in October made it almost unbearable with high humidity. I guess that’s what we get for having a mild summer. Local predictions were to have a very cold winter. So far, it’s been fairly mild. However the peppers were at there best in October. We harvested 55 lbs. in one week off a 3 x 16 foot bed. Needless to say, our CSA share holders were probably sick of peppers as were we.
As I said, we had good and we had not so good things happen in 2015. We lost our dearly loved Casper the perfect cat on December 5th. While we knew the time was near, it never makes it easier with a losing a loved pet. I have written many times about him in my blogs and he has had people come to visit him, rather than me. Such a proud and stately cat. There could not have been a sweeter cat on earth. Three years ago we adopted a 6 year old orange brat cat named Mabes. There could not be any two cats so different! While I have a void in my heart, she will kept me company in her own way. Rest in peace my dear little Casper. You will be missed.
2016 has arrived! We have received 1.24″ of rainfall so far, with a little snow covering yesterday morning. As always, I can’t wait to get my hands back into the garden soil. I look forward to the new arrival of baby goats the end of February, gardening, pruning, and sunshine once again. This will be the best year yet! Happy New Year Everyone!