Category Archives: Gardening

Planting, Growing, Care

Making Compost Tea

Making compost tea

Compost Tea, Day One

Over the years I have toyed with making many concoctions for the garden.  One of my favorite things I do is make compost tea…among many other teas!

It’s truly astonishing how many diverse beneficial, active, aerobic microbes there are in compost tea!  Really good compost tea can contain as many as 100 trillion bacteria per 1 ml.  WOW! Do I sound excited about compost tea?  Well I am!  Compost tea has many benefits for the garden.  Insect and disease control and plant health are the most important reasons for creating tea for your garden beauties.  It inoculates your soil with microbes. You can create it with a very small amount of compost if you don’t have much available to you.  It can also inoculate the leaves of your plants, which is something you can’t do with dry compost.  Compost teas helps to combat powdery mildew and controls insects such as spider mites.  We have seen decreased numbers of aphids on plum trees when using a spray of compost tea.  That’s something to toot about!

There are two methods of creating tea.   Non-aerated compost tea and aerated.  I prefer aerating my compost tea.  When it has air moving around, the microbes are more active and when you spray it on the leaves they ‘stick’ better to the surfaces.  So that’s the one we will talk about!!

To make a good tea, you need a few things to get started.

Air pump.  Like the ones used for fish tanks will do.

Air hose and a bubbler (preferable 2-3 bubblers)

5 gallon bucket

Whoo Hoo…There’s your kit!  Now for the ingredients!

Always use mature compost.  If compost has not decomposed fully, it can be harmful to your plants when making compost tea.  It should smell like good clean earth!  This if VERY important!

If you don’t make your own compost, then bagged will do, but your own compost is best.   Always look for compost that hasn’t sat out in the hot sun baking in bags for centuries!!  You know…Walmart parking lots!

8 cups of compost

16×16” of cheese cloth or other similar material

Tie for making a tea bag, I use natural jute

2 Tablespoons unsulfured blackstrap molasses

1 handful of kelp meal

5 gallons of non-chlorinated water (letting water sit out for 24 hours will work)

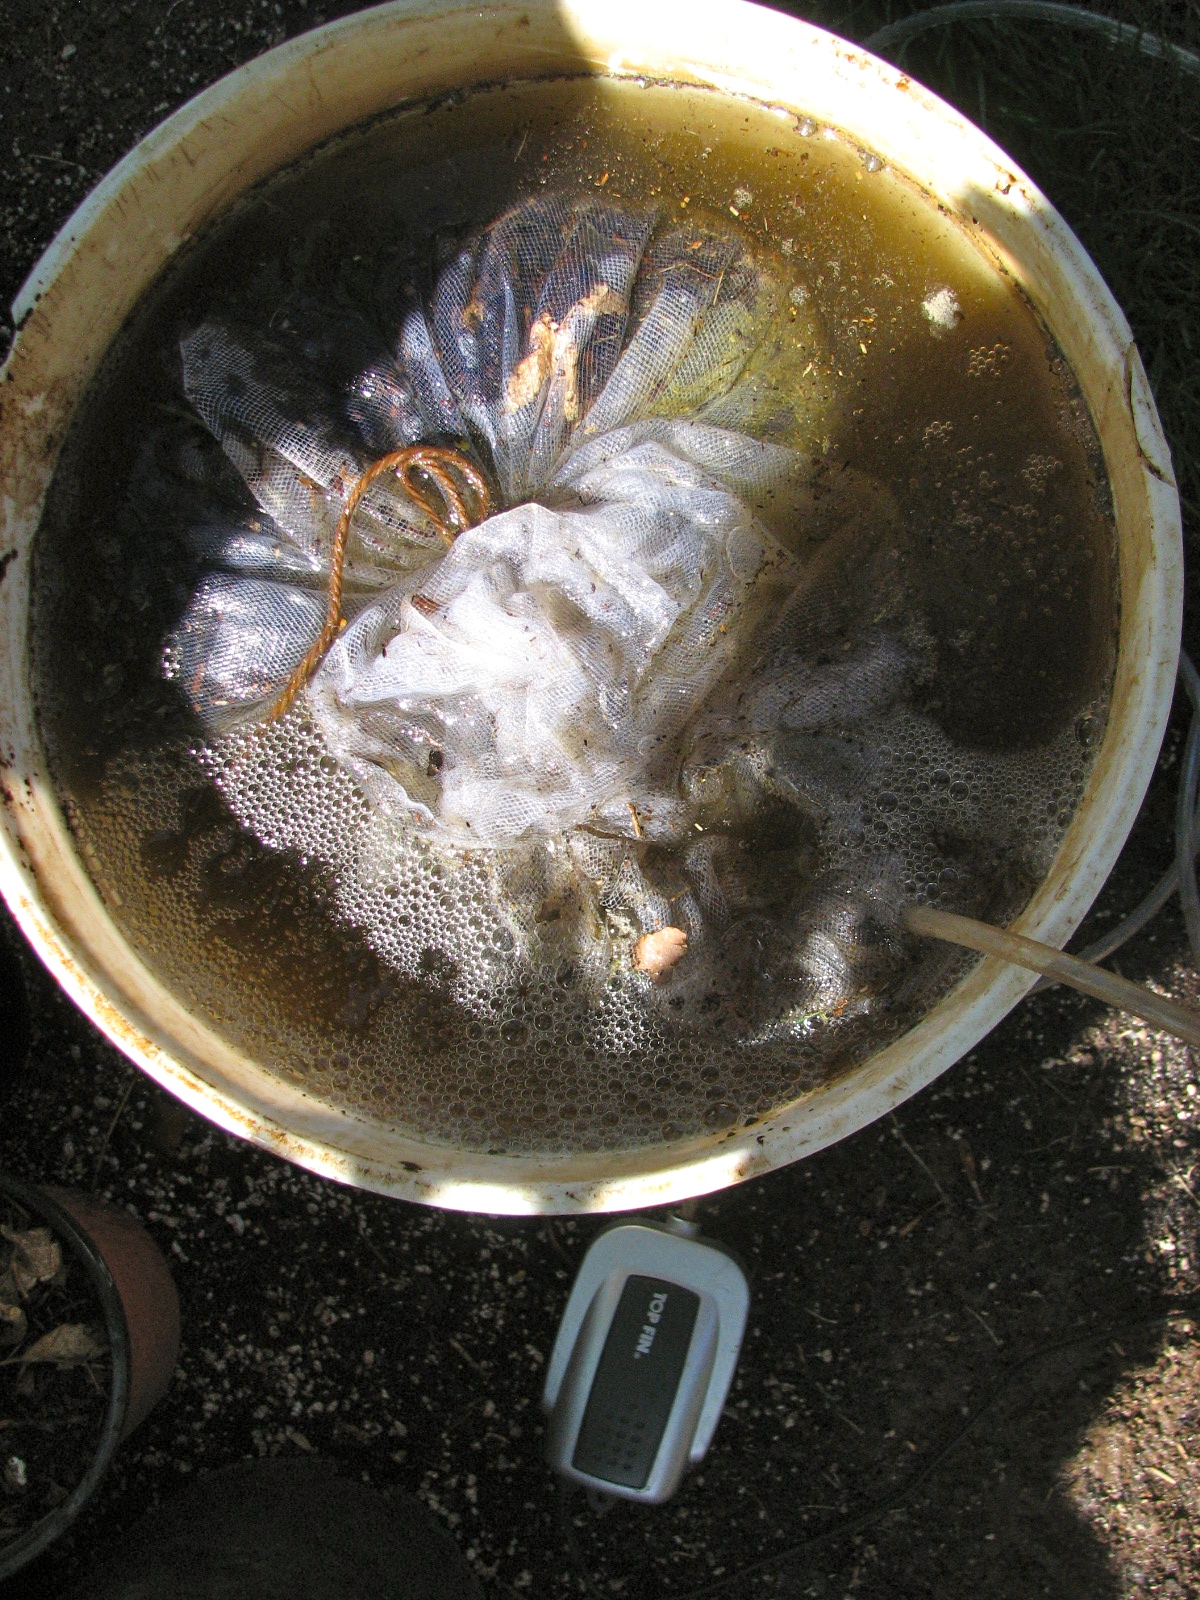
Place your bubblers in the bucket of non-chlorine water and place a rock on them to hold them at the bottom of the bucket.  You need the air to circulate the brew from the bottom up!  Add your molasses.  Place compost and kelp in cloth and tie to the top.  Toss your ‘tea bag’ into the percolating water, lightly set a lid, allowing air flow and let it brew for 3-5 days.  Brew should be kept out of the sun.  Once the brew is finished; it should be used within 8 hours.  Strain if you are using a sprayer.  I like to just pour it into a watering can and pour right over the top of plants when I am in a hurry, but it will go a lot further if you use a sprayer.  You won’t need to dilute your tea, but if you choose to make sure you never use chlorinated water.  You went to all that work, no sense in killing those microbes!  I only feed every three weeks to once a month, but there is no reason you can’t spray every week for plants that need a little extra love!

You can add other ingredients to your compost tea if you like.  Molasses, fruit juices and kelp promote more bacteria growth, while fish fertilizers, seed meals, humic acids and rock dusts promote more fungal growth.  Fungal teas are great for orchards and strawberries!  At the end of the brewing process you can add mycorrhizal fungi if you are doing a soil application.   Just remember that when using a mycorrhizae, it is only for soil and it will die if applied to leaf surfaces. Try a few different ingredients every time you concoct a brew and record what worked the best for you, but you should always use molasses and of course, compost!!

Leave a comment

Filed under Gardening

Unexpected Frosts!

Wow! Time has gotten away from me this spring! Between transplanting starts for our nursery, planting our own garden, and just keeping up this spring with the general spring chores and just life itself, I realized I haven’t written a blog in a while.
With this years unusual weather we have had, I am thankful I always have frost blankets ready to go at a moments notice to protect my crops. Our valley’s typical last frost date is April 15th. Well, this year has proven to us that Mother Nature can change her mind when she wants with a late light frost just morning April 18th. We have had a very mild March which tempted many of us to plant tomatoes, peppers and other ‘warm’ season crops….I do it every year, but I am ready to drop the cloth! There are several types of cloth, or also known as row cover. Look for ‘frost’ protection, like 50%. This will give you protection up to 8 degrees, which is good enough for a frost. You can double up your cover if you are expected temperatures to drop below 28 degrees. I cover even if the temperatures are in going to be in the low 40’s the cover goes on. Warm season crops are just that…Warm Weather lovers. When these vegetables are exposed to cold night temperatures tomatoes, peppers, eggplants, squash and especially cucumbers,they will stress, sometimes drop flowers, growth is halted, and they can become weak, which can make them more susceptible to diseases. This can be a little work at times, but well worth it in the long run. The cover should be removed during the day so the plants can absorb the sunshine unless the days are very chilly and windy. Keeping them covered is fine if for only a day or two. Most frost blankets will last for years and is a well worth while investment to protect your tender little crops! Today, the covers are being folded and put away (again) in hopes to not have to bring them out again this year, but if needed, I am ready! Watch your weather reports and expect lower temperatures then what is predicted and your early planted crops will pay off!

Frost Blanket/Row Cover

20130418-141923.jpg

Leave a comment

Filed under Gardening

Composting Chicken Manure

Chicken Compost

Chicken Manure Compost

Well how hard can it be?  Just toss it in a pile and let it sit right?  Sure you can, but if you want to use it without the burn, or wait a year or more, you might want to take a few more steps to get it right!  Chicken manure is high in nitrogen and is dangerous to plants if the manure is not composted properly.  The composting process allows time to break down the more powerful nutrients so that they are more useable by the plants. Depending on how diligent you are, composted chicken manure can be ready in as little as two months or if not so diligent, up to nine months.

When chicken manure is just piled up dry and left to sit, it will do just that, sit!  While the outside may get wet from sprinklers or rain, the inside of the pile will remain very dry.  The outer layer will form a crust and not let water penetrate.  You must have all the manure moist in order to begin the break down process.  You can use straight chicken manure, but I prefer to add other composting matter to the pile, this way it won’t smell like it would if you just used chicken manure.  Things like leaves, grass clippings, garden or kitchen scrapes.  You know, organic matter! Simply start to pile your manure in layers and sprinkle every layer.  Chicken poop, leaves, water, chicken poop, etc.  Add a couple of cups of blood meal or cottonseed meal to the mix (for a 3x3x3′ pile).  I know…it would seem that it wasn’t necessary, but it really does speed up the process!  Turn the pile to get everything mixed up.  If you want finished compost sooner, turn the pile every few days.  If time seems to be few and far between, try every week or even every other week.  Just remember the less you turn the longer the process will take.   If the pile seems rather dry, sprinkle it with water while turning.   If the pile gets to wet and becomes stinky, you can spread it out and allow it to dry for a few days.  You can use a compost thermometer to gauge how hot your pile is getting.  A temperature between 140 and 160 degrees is the optimum temperature range to break down pathogens, weed seed and get the decomposition really moving!  When the pile no longer heats up after turning, you know your compost is getting close to a finished product.   It should be dark and smell like earth.  Clean earth!  It’s time to add that black gold to the garden.  Till or spade the compost into the garden beds or use as a side dress for plants.  Chicken manure compost is full of nitrogen, it contains a good amount of phosphorus and potassium making it excellent for your veggies to grow in.

8 Comments

Filed under Compost, Gardening

With the Emergence of Spring Everywhere, It’s Time to Plant!

IMG_0496

Crocus are the fist to bloom!

Our long winters nap is over!  Although we still have those cold blistery winds, freezing temperatures, it’s time to start our spring garden chores.  The blank garden beds are starting to be amended, bulbs poking through the ground and plum tree buds are starting to swell.  Some of our first chores are to clean out the perennial beds from fallen and blown in leaves from autumn, prune the roses and apply a layer of mulch to the barren soil.  Our garden beds are turned, but not before adding plenty of compost, greensand, phosphate, and nitrogen. Once the beds have been amended they are carefully leveled out to take on their inhabitants for the spring months.  Peas, lettuce, spinach, brassica crops, fava beans and plenty of other cold hardy spring crops are put in at this time.  Keeping them moist so seeds germinate is very important, especially when the winds so easily dry them out.  We are fortunate in our zone 8 to start our gardens earlier than other colder zones.  When that first robin bird sings his song, the spring fever hits.  Pruning of fruits trees and a heavy spraying of dormant oil should be done before buds break.  We always find several praying mantis eggs while pruning and these are removed and placed in a protected spot in the garden before being coating with the tree oil.

IMG_0498

Pop in some pansies around your flowering bulbs for more spring color!

It’s only a few weeks away before many of the spring bulbs begin to show color and so we always pop in some pansies for more color.  Once the roses begin to grow their bronze, tender spring leaves it’s time to give them a couple healthy handfuls of alfalfa meal to help them develop nice big blooms.  Be careful not to prune boxwood shrubs or other evergreen shrubbery to early in the freezing season or to late when its hot or they will burn.  We prune ours the end of February here.  When the forsythia blooms it’s time to apply pre-emergent  corn gluten to prevent weeds from germinating in established beds or lawns.  Not only will it keep weeds down but it will also give your plants a good spring feeding.

Our chickens love the days getting longer and begin to lay once again those beautiful shades of dark brown, tan, green and blue eggs.  They will scratch the earth and stretch out in the sun all day long until dusk when they return to the safety of their coop.  We couldn’t do our little farm without our chickens.  Their manure adds to the richness of the compost, the egg shells get planted around the rose bushes or with tomatoes at the time of planting and sometimes they get fed to the worms in the worm bins.  And once you have had a farm fresh egg you will never want a store bought again!  Besides, there is nothing more relaxing then watching these feathered friends running around the orchard doing what they do.

Today we will be planting onions around the perimeters of our raised beds, usually over five-hundred plants.  half of them being Walla Walla and others of red, yellow and white varieties.  I have always preferred the little plants over bulbs because they always do better, get bigger and I have less of them that get thick necks and go to seed rather then produce a bulb.  They will get a little extra nourishment from a side-dress of composted manure.  Always cut back some of the green tops and root system before transplanting.  This will help them get a better start!  They have a tendency to die back a little anyway, so why not hasten the process and let them get growing!

IMAG0670

Casper is a little poser!

And we can’t forget to report on Casper the Perfect Cat!  After having teeth issues last summer and now no teeth (outside of two for decoration purposes only) he has gained 3 whopping pounds!  Not all of us would be happy about that!   He is on a special soft food diet, but after his repeated attempts to sneak down, and I mean sneak, low to the ground and all, to the neighbors to get his fix of hard food we now have to give him what he demands!  Hard Purina cat chow!

Corn Gluten,  Phosphate, Nitrogen, Alfalfa Meal Greensand

Leave a comment

Filed under Casper the Cat, Gardening, Life on the Farm